XR development in Unity 2020.3.26f1
I summarize here some relevant steps and connection commands to develop VR applications with Unity, OpenXR, XRIT and Oculus Quest. A preconfigured project in Unity v2020.3.26f1 can be cloned from: https://github.com/luiseduve/intro-vr-dev
Configuring Unity
The reason to move to OpenXR is because it is an open standard that solves the XR fragmentation that existed with the multiple proprietary APIs developed by each device maker. The next steps summarize the configuration of the Unity project and the integation of basic XR interactions (locomotion, object manipulation, user interfaces).
Configuring a new Unity project
This was tested with built-in pipeline but should work for URP and HDRP:
- Choose a target platform compatible with OpenXR:2.
- All-in-One VR with Oculus Quest (compatible graphic cards)
- HTC Vive / Vive Pro / Vive Pro Eye / Vive Pro 2
- Valve Index
- Windows Mixed Reality headsets
- Other conformant platforms: Varjo / Magic Leap / etc.
- Configure Unity as an XR project
- In Project Settings, install the XR Plugin Management
- Check ❎ OpenXR as provider
- In Interaction Profiles select Oculus Touch Controller
- For Android platform, Check ❎ Oculus Quest Support
- For standalone Oculus Quest, setup the Android settings as described here
- Add packages for XR interaction
- In Project Settings > Package Manager, Check ❎ Enable Preview Packages
- In Package Manager, install XR Interaction Toolkit v2.0 (XRIT)
- Open the Samples from XRIT and install Default Input Actions
- In the Project tab, choose each of the 6 presets in Samples > XRIT > 2.0 > Default Input Actions and click on Add to ActionBasedController default in the top-left corner of the inspector
- In Project Settings > Preset Manager, assign the
rightandleftfilter names to the presets corresponding to XRI Default Right Controller and XRI Default Left Controller, respectively.
- Create a basic XR scene
- For XR rendering, add a GameObject from XR > XR Origin (Action-based), it should already have the controllers preconfigured since we chose the six presets as default in the step before.
- Add a component Input Action Manager to the XR Origin
- Search in the Project for XRI Default Input Actions and add drag it to the Action Assets in the component recently added
- For locomotion, add a Game Object from XR > Locomotion (Action-based), by default it should work for teleporting
- Choose a Plane in the scene and add the component Teleportation Area
- For object manipulation (grabbing), add the component XR Grab Interactable to the target GameObjects
- For user interface, add the component Tracked Device Graphic Raycaster to an existing desktop Canvas. Set Event Camera to Main Camera under XR Origin
- Remove any existing Event System and add a new one from XR > UI Event System
- Compile for Windows PC as
.exeor switch platform to Android setting Texture Compression to ASTC before building the.apk
Official Documentation
- Generalities of XR with Unity
- Setting up an XR scene
- Docs Unity OpenXR v1.3.1
- Docs Unity XRIT v2.0.0-pre.6
Additional material
Interaction libraries
- Ejemplos de XRIT: https://github.com/Unity-Technologies/XR-Interaction-Toolkit-Examples
- VRTK: https://www.vrtk.io/
- MRTK: https://docs.microsoft.com/en-us/windows/mixed-reality/mrtk-unity/
UX/UI for XR
- http://www.vrhig.com/
- https://www.uxofvr.com/
Books
- LaValle S. M., Virtual Reality, Cambridge University Press, 2017.[Free download][http://vr.cs.uiuc.edu/]
- Jerald J., The VR Book - Human-Centred Design for Virtual Reality, ACM Books, 2016 Buy here
Performance Considerations for Standalone Oculus Quest
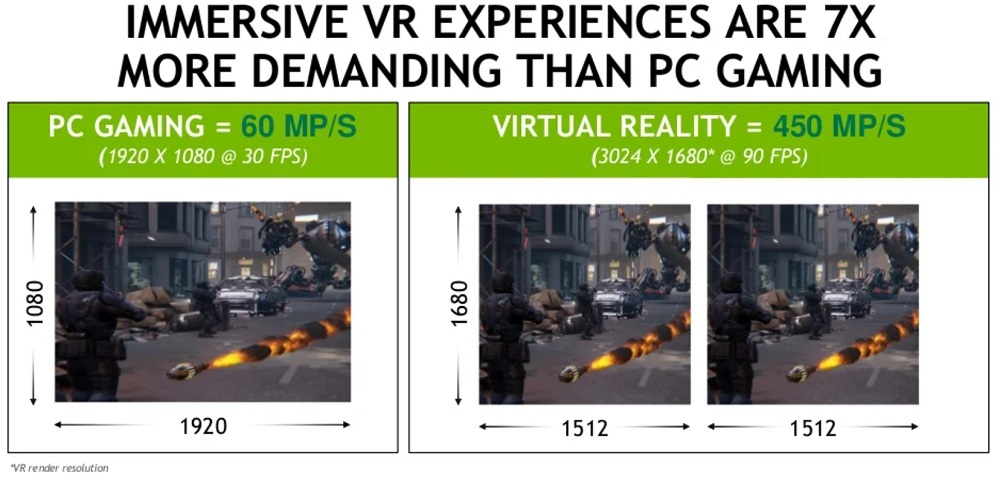
According to NVIDIA, rendering for VR is at least 7 times more demanding than rendering for desktop gaming.

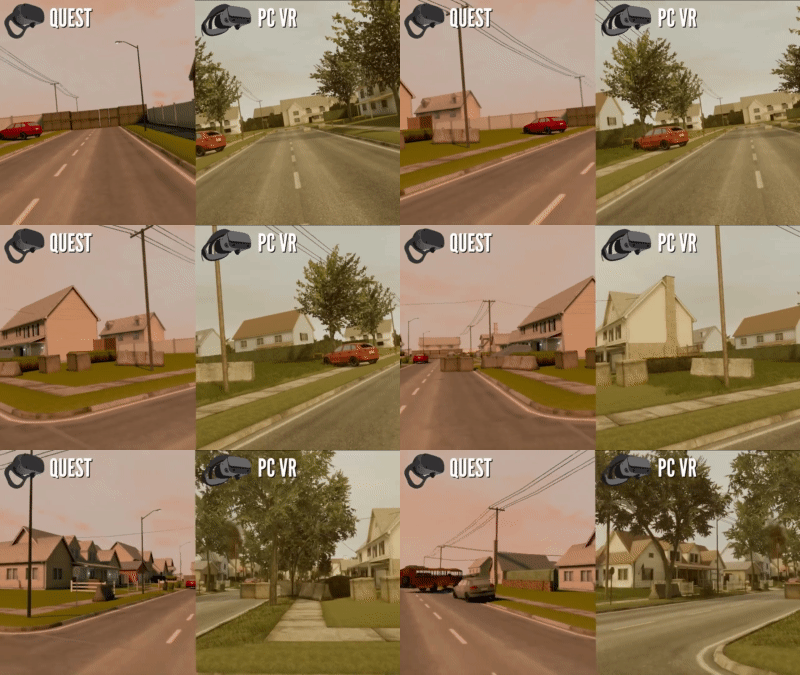
Rendering differences between desktop VR and mobile standalone VR. Taken from this video..

Target: The recommendation is to reach minimum 72FPS to guarantee comfort, the profiler should show maximum 500.000 triangles/frame.
A- Configure Unity settings
https://developer.oculus.com/documentation/unity/unity-conf-settings/
First, follow the official suggested configuration settings:
- In Build settings choose platform Android and Texture Compression to ASTC
- In ProjectSettings > Player:
- Set Minimum API Level to Android 6.0 Marshmallow (23)
- Set Color Space to Linear
- Choose first Graphics API in the list as OpenGLES
- Check ❎ Multithreaded Rendering
- Check ❎ Low Overhead Mode. This option can be omitted. It appears in the XR plugin manager when the XR Plugin Provider is Oculus, but does not appear when using OpenXR
- In ProjectSettings > Quality:
- Set Pixel Light Count to 1
- Set Texture Quality to Full Res
- Set Anisotropic Textures to Per Texture
- Set Anti Aliasing (MSAA) to 4x. When using URP, this configuration is from the Renderer Pipeline Asset, not from Project Settings.
- Uncheck 🟩 Soft Particles
- Check ❎ Realtime Reflection probes
- Check ❎ billboards Face Camera
B- Tech note Unity Dev from 2018
https://developer.oculus.com/blog/tech-note-unity-settings-for-mobile-vr/
Besides the previous configurations, this blog shows how setting Texture Compression in ASTC provides the best trade-off between quality and file size. But keep textures for UI as uncompressed.
- One of the most important settings for XR:
- Set Stereo Rendering Method to Single Pass. It draws the image once in both eyes applying vertex correction, instead of rendering once per eye. Read more here
- In ProjectSettings > Player:
- Check ❎ Use 32-bit display
- Uncheck 🟩 Depth and Stencil
- Check ❎ Static batching. It will combine meshes marked as static in one big mesh
- Check ❎ Dynamic batching. It will combine non-static meshes that share the same material, are <300 vertices, and without multi-pass shaders. Sometimes it might need to be off because it causes CPU costs.
- Check ❎ GPU Skinning. It moves the skinning of animated meshes to GPU and frees up CPU.
- Uncheck 🟩 Graphics Jobs because it does not work with Dynamic batching
- Check ❎ Prebake Collision Meshes. It computes physics meshes in build time allowing for faster loading times but creates larger
.apk - Check ❎ Keep Loaded Shaders Alive. It will increase initial app load time, but useful to reduce hitches caused by shader compilation on demand.
- Check ❎ Optimize Mesh Data. It will remove any vertex data from meshes that are not referenced by materials using the mesh. It will reduce final size of
.apk
- In ProjectSettings > Audio:
- Set DSP Buffer Size to Good latency
- Set Spatializer Plugin to Oculus Spatializer. Only available if you have Oculus Integration Toolkit, guide here
- Set Spatial Blend property to 1 in each Audio Source in the scene.
- In ProjectSettings > Quality:
- Uncheck 🟩 all the levels, except for Medium. That should be aggood starting point and should be checked ❎.
- Set Shadows to Hard Shadows only. Even Disable shadows can be used and use blurry blobs for character shadows, all other shadows should com e from baked lightmaps
- Set Blend Weights to 2 bones (maximum!)
- Set V Sync Count to Don’t Sync. Oculus runtime has its own V Sync (maybe better to leave as default if we use OpenXR)
- In ProjectSettings > Graphics:
- All tier levels should use Low for the standard quality. If possible, use mobile shaders instead of standard shaders.
- Set Rendering Path to Forward for all tier levels. Deferred rendering is too costly for mobile.
- Set Realtime GI CPU Usage to Low for all tiers
- Consider adding shaders to the Preloaded Shaders, it will impact loading times but avoids loading and compiling shaders on demand.
C- From OC6
Regarding the use of URP for Oculus Quest:
- Bake shadows in the lightmap, it is extremely costly for the tiled renderer of mobile platforms to render and resolve shadows per frame
- Final Blit Pass. Avoid it.
- Limit the number of resolves to one per tile.
- Keep in mind that intermediate render textures in standalone devices is that it breaks Fixed Foveated Rendering, which saves about 20% GPU performance per frame. Any rendering to intermediate texture will not have the FFR savings that we are looking for. E.g., Blit uses intermediate texture, that is why it is not useful.
D- Other informal rendering recommendations
- Prepare the 3D meshes to reduce triangles (e.g., welding, cubes instead of cylinders)
- Share textures among objects to reduce draw calls
- Configure LOD with proper thresholds for the camera
- Aiming for
URPwith Medium quality is a good way to start - URP has the BakedLit material specifically for baked lighting and very performant
- Set Material Textures with trilinear filtering and increase anisotropic if the textures are not clear from an angle
- Check ❎ Mipmaps for UI Textures to solve flickering edges
- Configure Bake Occlusion Data to stop rendering objects behind otehr objects (Window>Rendering>Occlusion)
- All UI Canvas are quite expensive, disable if not needed and Check ❎ Raycast Target only on required child objects, usually background and buttons.
- Check ❎ Extra padding in TMPro objects
- When coding, try to avoid
Start()andAwake(), useOnValidate()instead to call a value when the Unity inspector is changed - Set Fixed Timestep to the value
1/[VR refresh rate] - Use OVRMetricsTool to see real-time performance in VR
General Connection Commands
Connecting to Oculus Quest using Unity’s ADB
Full path to Unity’s ADB executable:
C:\Program Files\Unity\Hub\Editor\202X.X.Xf1\Editor\Data\PlaybackEngines\AndroidPlayer\SDK\platform-tools
Manuals for ADB Debugging:
- ADB manual for sending commands Wirelessly
- Connect Android to Unity Debugger
- Download Android SDK Platform-Tools
Screen casting connected to PC
SideQuest already includes an option to do streaming easily. However, it can still be done using scrcpy, it also includes ADB.
1
2
$ ./adb devices
$ ./scrcpy --crop 1200:800:180:320 -m 1600 -b 25M
Screen casting via WiFi
>> .\scrcpy.exe -c 1440:1600:0:0 -m 1600 -b 8M
To get the IP address of the Android phone/Quest
1
2
3
4
5
6
7
$ ./adb.exe shell ip addr show wlan0`
OR
$ adb shell
Monterey:/$ ip -f inet addr show wlan0
7: wlan0: <BROADCAST,MULTICAST,UP,LOWER_UP> mtu 1500 qdisc mq state UP group default qlen 3000
    inet 10.200.XX.XX/18 brd 10.200.XX.255 scope global wlan0
       valid_lft forever preferred_lft forever
To connect via WiFi
1
2
3
4
>> ./adb.exe devices
>> ./adb.exe tcpip 5555
[disconnect the device from the USB port]
>> ./adb.exe connect 10.200.XX.XX:5555
Install/Uninstall APK
adb install -r <app name.apk>: The -r option allows you to re-install or update an existing app on your device
adb install -s <app name.apk>: The -s option lets you install app to SD card if the app supports move to SD card feature
adb uninstall <app name.apk>